
Here is a seven step guide to create unique custom paddles for students for becoming a new member of a fraternity or sorority which they can later on hang it on the wall to admire.
Instructions
Follow these instructions and you will notice that it is rather easy to create your own custom paddles.
Step 1:
The exact first aspect is to note the specifications determined by your sorority or fraternity-for example, the size and color, your big sister’s or brother’s name, the emblem of your school, or names. Many schools even specify the pledge classes inscribed on them.
Step 2:
The next step is towards the decision as to what way the paddle should be placed and in what arrangement, and this is best done on a rough draft. Note the number of letters to be arranged in space and draw them with the exact measurements while creating the draft. If that is not possible then fix up a scale and follow the same ratio.
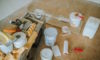
Step 3:
At this step, you will need to buy all that you need to make the paddle. Palin wooden paddles are available in the market, and they come in various sizes (13-72 inches) and various colors. If you will make a little survey of the entire market you might actually get one with your school logo on it!
The next is buying the wooden letters, and the online stores are the best options. Myriads of materials are also available for the letters like acrylic and foam, but wood is timeless and durable. Nothing can match its elegance!
Step 4:
Now don’t forget to buy some good quality adhesive because you would like your paddle to last long. If you are buying wooden paddles then get some glue that is actually buy levitra in australia meant for wood. Again some letters may be supplied with glue, and in that case you will not need to buy glue at all.
Step 5:
The shield or crest for your school is already available in the local store and many stores have size options. Buy them since it is the easiest way and saves time and effort. Match them with the right color.
Step 6:
Regarding the acrylic paint, you must use it in its thick consistency. Buy more than you feel that you need and if you don’t utilize it entirely then maybe you can use it for some other purpose like creating custom made photo frames. While making paddles be patient and apply the color evenly on all areas. After the first coat has dried up apply a second and third coat. But before applying the next coat be sure that the last coat has dried up.
Regarding the letters, paint them separately and apply two or three coats. Mind the curves and corners and don’t leave out any place. The letters should also be thoroughly dried before the final assimilation.
Step 7:
Now it is time to assimilate the painted paddle and the letters. Before applying glue on the letters just keep them on the paddle and check which way they look best. Try some unique ideas- like placing them in a tilted line or in a haphazard manner. Now glue the letters one at a time without applying too much or too little glue on each. After this step, you will have to let the glue dry up totally and while doing so rest the paddle on a flat surface.
Now your paddle is ready, and you may hoist it on the wall as a keepsake.
How to Design Custom Paddles for Students,

Dan Delion
Mar 09. 2020
Pls Give The Shoes To Me Because My ClassMates Bullying me They Say I Have
A BadShoes So Pls Give The Shies to me I Beg you I
Hope You Understand Pls 🙂
ปั๊มไลค์
Jun 09. 2020
Like!! Great article post.Really thank you! Really Cool.